Setting up an Apache Aurora/Mesos Cluster with Vagrant
Wednesday, 15 January 2014Over the past 1.5 years, I’ve been given the unbelievable fortune to work with some of the most awesome people I’ve ever worked with in my life. My work at twitter.com has taken me from working with a few hundred machines at a time at my last job, to thousands. In order to have all these machines work together, you need to have some kind of cluster management system. Without such a system, whether home grown, purchased, or hacked together, you are doomed to be awake during your whole pagerduty rotation. In this article I will try to point out parts of the basic system that I work with every day.
None of this would be possible without the hard work of every single developer on the Apache Aurora and Apache Mesos projects. Their hard work has made all this possible. I’ve personally seen these people work their butts off, both on all the work inside the company, and then again in order to open-source all the software they have written. I’m very proud to be able to work beside these people.
Basic Overview
 I will attempt to describe some of the basic building blocks of an Apache Aurora
cluster. In the setup that we will use here, there will be four basic types
of machines that comprise an Apache Aurora/Mesos cluster:
I will attempt to describe some of the basic building blocks of an Apache Aurora
cluster. In the setup that we will use here, there will be four basic types
of machines that comprise an Apache Aurora/Mesos cluster:
- ZooKeeper Server(s)
- Apache Mesos Master(s)
- Apache Mesos Slave(s)
- Apache Aurora Scheduler(s)
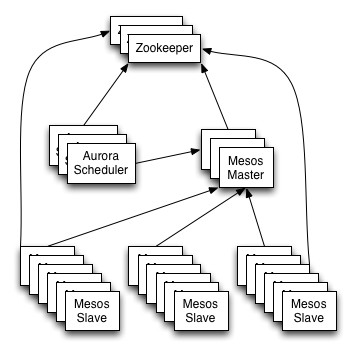
As this diagram shows, all the pieces of this cluster management solution have been designed in such a way that you can stand up multiples of each type of machine, and they will back each other up. In this tutorial we will only stand up one of each kind to save on resources.
As a quick architectural overview, each of these machines has a specific function within the cluster. In particular,
ZooKeeper: This machine is there to offer two services to the cluster. On the one hand, it is a place to store information about the cluster, such as the location of the masters and schedulers. On the other hand, it is also a distributed lock service, which is used by the Apache Aurora scheduler (or just “scheduler”) to implement leader election when there are more than one scheduler running at the same time. In a cluster, this machine is usually so important, that you would usually stand up several of them, and they would all work together to provide these services. Please see other tutorials online and the ZooKeeper documentation to learn more.
Apache Mesos Master: This machine (or multiple machines) are the coordinators within the Apache Mesos cluster. They keep track of all the slave machines, all the tasks running on the slaves, and all the frameworks (schedulers) that have started tasks on slaves. The masters keep track of resources, and will notify each framework of task state changes, such as a lost task due to a slave rebooting, a network partition, or a multitude of other things.
Apache Mesos Slave: This machine (or usually many machines) are where all the tasks in the cluster get run. They send offers of resources to the masters, and receive instructions from the masters to run various tasks. The slaves also communicate with the masters on a regular basis to let the masters know that they are still alive, and to update the masters with any task state changes. The slaves use a component called an executor to start tasks. We will not go into detail about executors in tutorial, or Thermos the executor used in this tutorial.
Apache Aurora Scheduler: This machine (or machines in a larger cluster) is what runs the scheduler, or framework, for the cluster. This is the part that receives resource offers from the master, job configurations from the user, and then will use various scheduling constraints and algorithms to schedule and instruct the masters to run the tasks from each job on the various slaves. Based on the configuration of the job, the scheduler may restart tasks that have failed.
There will be a fifth machine that we will be working with today:
- Devtools: This machine provides a consistent build environment and is not strictly required to run the cluster. We will be using it to build parts of the Apache Aurora cluster software.
Vagrant Setup
In our setup, we will be using Vagrant to provision and setup our virtual machines. There are any number of tutorials out there to help you learn how to setup a basic Vagrant environment. In particular, our machines are all based off the vagrant precise64 base image. Make sure you have the correct version of this image added to your vagrant box list. One of the following commands should do the trick, depending if you’re using the virtualbox or vmware fusion providers:
$ vagrant box add precise64 http://files.vagrantup.com/precise64.box
# vagrant box add precise64 http://files.vagrantup.com/precise64_vmware_fusion.box
At this point, you should be able to get a basic vagrant precise64 image up by doing something like this:
$ mkdir vagrant-dir && cd vagrant-dir
$ vagrant init precise64
$ vagrant up
If this does not work, then you will need to solve your vagrant issues first. Please use Google, or your favourite search engine to search and find a Vagrant tutorial to get you started.
Getting the Code
Once Vagrant has been set up, the next step is in acquiring all the code you will need. The Apache Aurora code is all available via git at the github mirror. Make sure you are in a clean directory, and let’s checkout the code:
$ git clone https://github.com/apache/incubator-aurora
$ cd incubator-aurora
At this point, you have a full copy of the Apache Aurora source code, along with the Vagrant configuration required to build and run a basic Apache Aurora cluster.
Devtools Setup
In order to get a development environment up, and build all the development tools, we stand up the vagrant devtools image. Vagrant will clone the precise64 image, update it, and then proceed to build all the necessary software by fetching dependencies and building each in turn. This may take some time.
$ vagrant up devtools
Once this finishes, we can see all the artifacts this has created. You can see these artifacts in the dist directory.
$ find dist
dist
dist/aurora_admin.pex
dist/aurora_client.pex
dist/distributions
dist/distributions/aurora-scheduler-0.5.0-SNAPSHOT.tar
dist/gc_executor.pex
dist/thermos_executor.pex
dist/thermos_observer.pex
At this point, we are ready to start standing up the actual machines that will make up the cluster and its supporting infrastructure, using all of the software artifacts that were built by standing up our devtools image.
ZooKeeper Setup
In order for all of the pieces of our cluster to find each other, they can all be configured to use ZooKeeper. This has some additional nice properties, such as being able to stand up multiple redundant master and scheduler machines, as they will use ZooKeeper to coordinate leader election and manage fail-over between multiple masters and schedulers. In our setup, we will be standing up only one of each, but having a ZooKeeper instance up makes growing the cluster a trivial affair, and standing up a ZooKeeper machine is fairly simple.
$ vagrant up zookeeper
At this point, vagrant should have configured and booted a single ZooKeeper machine. We can verify that the ZooKeeper machine is running the ZooKeeper service via ssh to the ZooKeeper machine, or by hitting the administrative endpoint on the machine directly.
$ vagrant ssh zookeeper
$ echo stat | nc 192.168.33.2 2181
Zookeeper version: 3.3.5--1, built on 03/23/2012 18:07 GMT
Clients:
 /192.168.33.1:54266[0](queued=0,recved=1,sent=0)

Latency min/avg/max: 0/0/0
Received: 1
Sent: 0
Outstanding: 0
Zxid: 0x6d
Mode: standalone
Node count: 9
$ vagrant ssh zookeeper
vagrant@precise64:~$ sudo /usr/share/zookeeper/bin/zkCli.sh ls /
Connecting to localhost:2181

WATCHER::

WatchedEvent state:SyncConnected type:None path:null
[mesos, zookeeper, aurora]
vagrant@precise64:~$ exit
logout
Connection to 192.168.54.130 closed.
As you can see, sending a quick “stat” command to the ZooKeeper instance makes
it respond with a quick status. We can also ssh into the ZooKeeper machine,
and run the zkCli.sh command to explore the tree that ZooKeeper provides.
Apache Mesos Master Setup
The next logical type of machine to get operational is an Apache Mesos master. This will be the machine that will keep track off all the slaves, and provide a programmatic interface to the cluster for any frameworks running on Apache Mesos. One of these frameworks is the Apache Aurora scheduler, which we will get working a little later on. (There are other frameworks, such as Marathon). Let’s stand up our master, and verify that it is working.
$ vagrant up mesos-master
$ curl -s http://192.168.33.3:5050/stats.json | python2.7 -mjson.tool
{
    "activated_slaves": 0,
    "active_schedulers": 0,
    "deactivated_slaves": 0,
    "elected": 1,
    "failed_tasks": 0,
    "finished_tasks": 0,
    "invalid_status_updates": 0,
    "killed_tasks": 0,
    "lost_tasks": 0,
    "outstanding_offers": 0,
    "staged_tasks": 0,
    "started_tasks": 0,
    "total_schedulers": 0,
    "uptime": 59.075913984,
    "valid_status_updates": 0
}
At this point, we should have a working master. We can also hit some other useful endpoints with our web browser, such as:
- http://192.168.33.3:5050/
- http://192.168.33.3:5050/help/
- http://192.168.33.3:5050/state.json
- http://192.168.33.3:5050/stats.json
The master web interface gives a convenient method to check up on the cluster and get some basic information about what frameworks are using what resources, as well as which Apache Mesos slaves and resources are available. Since we have not started any slaves, your master should be showing zero slaves, and be a pretty much empty page. Let’s change that.
Apache Mesos Slave Setup
In the last step, we set up an Apache Mesos master machine. In this step, we will get an Apache Mesos slave up. As the overview described, the Apache Mesos slaves is where all the real action happens. Each slave offers its resources to the Apache Mesos master, and allows the Apache Mesos master to give it tasks to execute. In our test setup, we will be standing up a slave with a minimal set of resources. Along with the slave, we will be running a Thermos executor and observer on the same machine. These pieces of software work together with the Apache Aurora scheduler and Apache Mesos slave to enable the execution of arbitrary tasks, as well as providing an interface where these tasks can be more closely observed.
Let’s get a slave up and running, and verify that it is ready to serve its
master. While vagrant is standing up the slave (as shown next), feel free
to look at the master web interface, refreshing it periodically. You should
see the Slaves - Activated portion of the interface show you that there is
a single activated slave as soon as vagrant has stood up the image.
$ vagrant up mesos-slave
$ curl -s 'http://192.168.33.4:5051/slave(1)/stats.json' | python2.7 -mjson.tool
{
    "failed_tasks": 0,
    "finished_tasks": 0,
    "invalid_status_updates": 0,
    "killed_tasks": 0,
    "lost_tasks": 0,
    "recovery_errors": 0,
    "registered": "1",
    "staged_tasks": 0,
    "started_tasks": 0,
    "total_frameworks": 0,
    "uptime": 335.72762112,
    "valid_status_updates": 0
}
If you click on the Slaves tab at the top of the master web interface, you should see a list of the slaves and the resources they have. We can query the master json endpoint directly and see that we have a single slave as well:
$ curl -s http://192.168.33.3:5050/stats.json | python2.7 -mjson.tool | grep activated_slaves
    "activated_slaves": 1,
    "deactivated_slaves": 0,
At this point, we basically have a minimal Apache Mesos cluster up and running. There is no framework (scheduler) running, and no tasks running within the cluster. With no scheduler running, the cluster is pretty much useless. However, this is the base required to now be able to run any Apache Mesos framework on top of this cluster.
Apache Aurora Scheduler Setup
We finally get to the stage where we can stand up Apache Aurora, an Apache Mesos framework, or scheduler. The scheduler will be able to launch jobs and give a much higher level interface to the Apache Mesos core.
$ vagrant up aurora-scheduler
$ curl -s http://192.168.33.5:8081/vars | grep framework_registered
framework_registered 1
If the above curl command returns that the framework is registered, then the
Apache Aurora framework has contacted the Apache Mesos master, and registered
itself. You can see this from the
Frameworks Tab on the Apache Mesos
master web interface as well. The scheduler provides a rich web interface
that can be very useful for both customers looking at their jobs, as well as
administrators to help them debug any issues with the cluster. In particular,
the following endpoints will likely prove useful:
As you can see, there are a number of things available under the root of the tree. Feel free to explore. :)
Launching your first job
Thankfully, the Aurora developers have included an example job that can be launched in this cluster.
$ cat examples/jobs/hello_world.aurora
hello = Process(
  name = 'hello',
  cmdline = """
    while true; do
      echo hello world
      sleep 10
    done
  """)

task = SequentialTask(
  processes = [hello],
  resources = Resources(cpu = 0.5, ram = 128*MB, disk = 128*MB))

jobs = [Service(
  task = task, cluster = 'example', role = 'www-data', environment = 'prod', name = 'hello')]
As you can see, this job does not do a whole lot on its own, but it should
give you the beginning of a glimpse into what can be done. This particular
job will simply run a shell that types hello world to stdout. It asks for
half a CPU, 128MB of ram, and 128MB of disk to be allocated to the task. Let’s
create this job, and see what happens.
$ vagrant ssh aurora-scheduler
vagrant@precise64:~$ which aurora
/usr/local/bin/aurora
vagrant@precise64:~$ aurora version
Aurora client build info:
	sha: b7a82050e9467422274e9e759e4fc50c40ca7c53
	date: Thursday Jan 16, 2014
Aurora API version: APIVersion(major=3)
vagrant@precise64:~$ aurora
# <aurora command help removed>

vagrant@precise64:~$ cd /vagrant/examples/jobs/
vagrant@precise64:/vagrant/examples/jobs$ aurora create example/www-data/prod/hello hello_world.aurora
 INFO] Creating job hello
 INFO] Response from scheduler: OK (message: 1 new tasks pending for job www-data/prod/hello)
 INFO] Job url: http://precise64:8081/scheduler/www-data/prod/hello
This may be a bit confusing at first, so let’s break it down. First we ssh
into the vagrant machine that is running the scheduler. Then we run a few
commands to demonstrate where the aurora command line client is located,
and a way you can invoke it to give you information about what version of
the client you are interacting with, as well as a way to look at the help
for the command. Next we change our directory to be in the place where
the sample job configuration file is. And then, we launch the job using
the aurora create command, which takes two main arguments.
- A job key, consisting of:
<cluster>/<role>/<env/<jobname> - A job configuration file
The jobkey selects the particular job you want the aurora command to work
with from the job configuration file. If you look closely, aurora tries to
be helpful, and provide you with a direct URL for the job you just created.
However, there seems to be a small bug here, as the client is simply printing
out the machine name, as opposed to the IP address. This may be fixed by the
time you get around to looking at this. In any case, you can look either
look at the scheduler page, and click the links down to the job specific page,
or you can hit it directly by going to
http://192.168.33.5:8081/scheduler/www-data/prod/hello.
On this page, you should see a single active task for the job hello. In particular, if you click on the “show details” button, you should be presented with more information about the resources this job has asked for. Clicking on the little “+” sign in the status column of the active tasks section should give you more information about the task states this particular task went through. The same line will also tell you which host this task is running on. If you click on the host link, the web browser will take you to the Thermos observer running on the particular Apache Mesos slave running this task, and will allow you to inspect this particular task in more detail.
Thermos and Observer
Each Apache Mesos slave that is running tasks from an Apache Aurora framework will likely be running these tasks using Thermos. Thermos itself is really two parts:
- an executor that launches and manages your tasks within each task sandbox.
- an observer that runs outside of the sandbox, and can be used to observe each of the Thermos controlled tasks running on a slave.
If you clicked on the host link in the previous section, you will now be on a
web page that shows you several things about the running task. In particular,
you should be able to click on the stdout link, and see what this task is
printing to stdout.
You should also notice that this particular page is specific to this one task. If the task dies, and gets restarted by the scheduler, it will get a new task id, which means that there will be a different URL for the currently (newly) active task. You can also go to the Thermos Observer’s top level page on a slave http://192.168.33.4:1338/. As you can see, the task you started earlier should be listed here as well.
Cleanup and Shutdown
This post is getting rather long in tooth, (and it’s getting late at night) so lets kill off the job, and shutdown our Vagrant images. First we’ll kill off the job we created:
vagrant@precise64:/vagrant/examples/jobs$ aurora kill example/www-data/prod/hello
 INFO] Killing tasks for job: example/www-data/prod/hello
 INFO] Response from scheduler: OK (message: Tasks killed.)
 INFO] Job url: http://precise64:8081/scheduler/www-data/prod/hello
vagrant@precise64:/vagrant/examples/jobs$ exit
logout
Connection to 192.168.54.133 closed.
Feel free to browse through the various web interfaces and endpoints during all of this, as well as after you’ve killed off the job. This will make you more familiar with the interface and recognizing the various states a job and task can be in (alive, dead, etc).
Next we will stop all the vagrant images:
$ vagrant status
$ vagrant status
Current machine states:

devtools                  running (vmware_fusion)
zookeeper                 running (vmware_fusion)
mesos-master              running (vmware_fusion)
mesos-slave               running (vmware_fusion)
aurora-scheduler          running (vmware_fusion)

This environment represents multiple VMs. The VMs are all listed
above with their current state. For more information about a specific
VM, run `vagrant status NAME`.
Note, I’m running a vmware fusion provider for Vagrant, your output may look
slightly different if you are running the VirtualBox provider. As you can see,
all five machines are still up and running. Using vagrant halt will shut
down all of the images for you.
More documentation for much of this, as well as the configuration reference, getting started guide, user guide, and tutorial can be found on the GitHub clone of the Apache Aurora repository:
GitHub should nicely render all the markdown documentation. The documentation might be a little rough in some places (it was open sourced along with the code not too long ago), but it is voluminous, and very well written. If you’d like to stand up a more substantial cluster, you could use the Vagrant images to get you started, or you could use Elastic Apache Mesos to stand up your own cluster inside AWS.